Getting started
This guide lists the necessary steps for creating your first report template and report, and managing alerts and maintenances via DataForge.
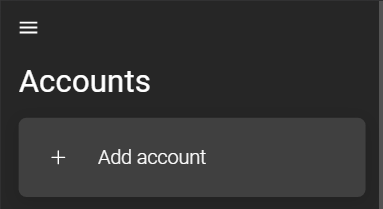
1. Add an account
To log into DataForge, you need to add an account.
The differences between the IntelliTrend Mobile for Zabbix app and the web service are described in the chapter accounts.
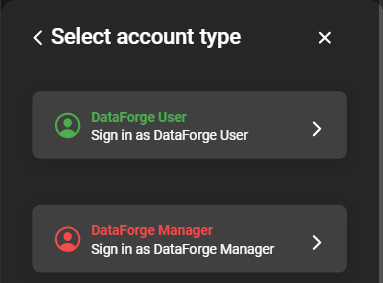
You have to choose whether you are logging in as a DataForge User or an DataForge Manager. A DataForge User is an imported Zabbix user. This user can access various sections of DataForge, including the Zabbix client, Self provisioning, and Reporting. This user type does not possess administrative permissions.
Choose DataForge User:
The login form requires the following information to proceed and access your DataForge User account:
DataForge Users need to exist in a Zabbix environment and have to be imported by a DataForge Manager. If you can’t log in with your Zabbix credentials, please contact your DataForge Manager.
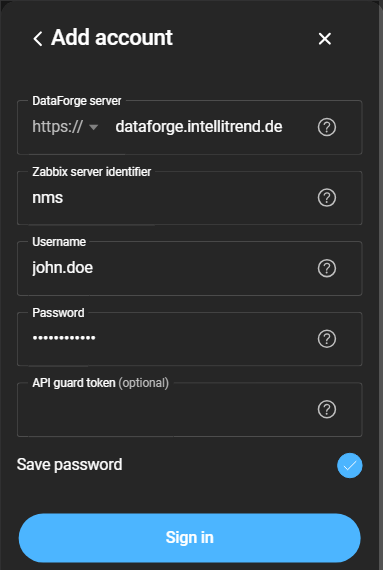
- DataForge Server: The URL of the DataForge server without
https://orhttp://. The URL prefix will be selected via the dropdown. - Zabbix server identifier: The Zabbix server alias of the server from which the DataForge User originated.
- Username: Your designated username.
- Password: Your designated password.
- API guard token: Adds an extra layer of security if provided.
- Save Password: Saves the password for future use, if enabled.
2. User group
A DataForge user group is a special Zabbix user group with strictly defined settings. Users who are part of a DataForge user group and have the necessary permissions defined by their user role can access the reporting section. The capabilities of a DataForge User within reporting can be managed by a DataForge Manager.
A user is not involved in managing user group assignments, nor can a user interact with them directly. If you have not been assigned to a user group yet, please contact your manager for assistance.
If you are a DataForge Manager or want to know more about user groups, please refer to the chapter DataForge user groups.
3. Checking available data with the Zabbix client
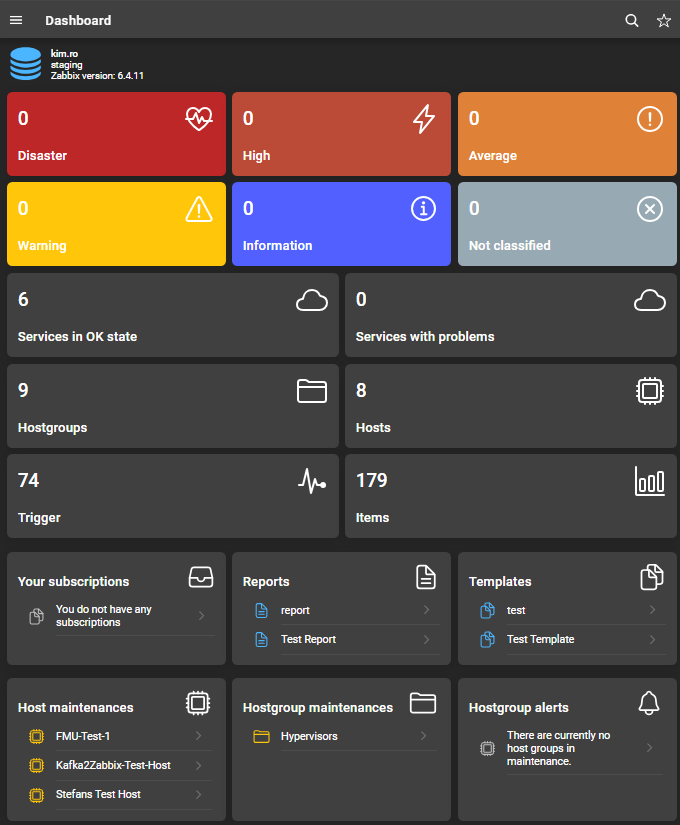
After the logging in, you’ll find yourself on the dashboard. This page will offer you an overview about the Zabbix server. This includes the user name, server alias and version, but also information about problems, services, hosts, host groups, trigger, items, templates, reports, subscriptions, maintenances, and alerts. More information about all these sections can be found in the user manual.
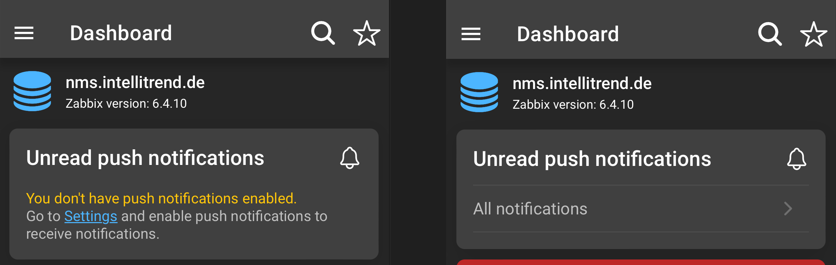
When using our IntelliTrend Mobile for Zabbix app, you’ll notice additional information regarding push notifications just below the server details. If push notifications are not yet enabled, a note will be displayed, offering access to the push notification settings. Alternatively, if push notifications are already enabled, the last two unread push notifications will be displayed in this section.
How to enable and configure push notifications for your device can be found in the chapter about push notifications.
From this point you have the option to navigate using either the cards or the navigation tree to explore the available data. When using the cards to navigate to specific sections, the relevant filters will be applied automatically.
Detailed information about the dashbaord can be found here.
4. Enable push notifications
This feature is only available on IntelliTrend Mobile for Zabbix app.
IntelliTrend Mobile for Zabbix offers a push notification service that provides real-time alerts. In conjunction with our alert feature (Step: 10. Configure alerts), you can specify the hosts and severities for which you wish to receive notifications.
Detailed information about push notifications can be found here.
5. Creating a template
Requires the user to be a part of a DataForge user group as mentioned in 2. User group.
Dataforge offers a reporting feature to generate reports based on the data of your Zabbix server. To have access to this feature, you need the necessary user role and must be a member of a user group. The first step in creating a report is to create a template, a collection of widgets, as they serve as the foundation of reports.
Detailed information about templates can be found here.
Additionally, while widgets are mentioned within the templates chapter, there is also a separate chapter dedicated to widgets.
6. Creating a report
Requires the user to be a part of a DataForge user group as mentioned in 2. User group.
After creating and configuring a template to suit your specific needs, you can use it as the foundation for generating your report. The report’s settings allow further customization of various parameters, including the scheduling mode (the frequency of report delivery and time period for data collection), as well as limits for text items and problems.
Additionally, within the report configuration, it’s possible to edit the widgets defined in the template. While editing widgets on the report level, the underlying template won’t be altered. This can be useful when creating multiple similar reports with slight variations. The JSON transformer serves as a powerful tool for manipulating the JSON file generated by DataForge, offering further customization options.
Detailed information about reports can be found here.
Detailed information about the JSON transformer can be found here.
7. Create a user medium
The delivery of reports is dependent on the configuration of a user medium. DataForge provides three base types of media: Email, SCP, and Kafka. These have to be created and configured by DataForge managers. Once at least one configured base medium type exists, you can proceed to create a user medium to receive reports through your preferred channel.
Detailed information about user media configuration can be found here.
For the configuration of base media types, check the manager manual’s chapter media types.
8. Subscribe to a report
Requires the user to be a part of a DataForge user group as mentioned in 2. User group.
To receive reports in DataForge, you must subscribe to them. One or more rendering types have to be selected for a report subscription. DataForge offers several rendering types, including: JSON, XML, CSV, and PDF. Additionally, you need to select the user medium or user media through which you wish to receive the report. The delivery interval of a report depends on the schedule mode of the report.
Detailed information about subscriptions can be found here.
9. Configure a maintenance
Users can view and configure maintenances for hosts and host groups. Maintenances can be set up with or without data collection and can be applied to all sub hosts and host groups.
Detailed information about maintenances can be found here.
10. Configure alerts
Alerts allows you to configure notifications for specific host groups based on triggered problems with certain severities. These alerts leverage Zabbix’s alert system, including media types that determine where notifications are sent. The push notification feature of the IntelliTrend Mobile for Zabbix app enhances this functionality by enabling alerts to be received as push notifications on your mobile device.