Push notification
To enable push notifications, you must import our IntelliTrend Mobile mediatype on your Zabbix server. You can download this mediatype from our github repository. If you are a privileged user (Zabbix Super Admin), the IntelliTrend Mobile for Zabbix app allows the automatic creation of a Zabbix user medium for your profile, which enables push notifications to be sent to your device.
When an alert is sent, the IntelliTrend Mobile media type triggers a webhook, on the IntelliTrend push server, which then triggers a webhook to send the data to Firebase Cloud Messaging (FCM). FCM in return sends a push notification to the registered device. This works for Android and iOS based phones and tablets.
Setup push notifications: Step by step
Follow these steps to set up push notifications:
- Download and import the “IntelliTrend Mobile” media type for Zabbix.
- Register your device.
- Optional: Configure trigger action
- Optional: Subscribe to alerts.
Download and import Zabbix media type
The push notification service of the IntelliTrend Mobile for Zabbix app requires the installation of our “IntelliTrend Mobile” mediatype. You can download it from our github repository:
To import this media type simply follow the excerpt from the Zabbix documentation of the chapter Media types :
A Zabbix user with the admin role or higher is required for this step.
- Go to Alerts → Media types.
- Click on Import to the right.
- Select the import file.
- Mark the required options in import rules.
- Click on Import.

In case you want to update an existing version of the IntelliTrend Mobile media type, make sure to also check the Update Existing checkbox.
Register your device
After installing and launching the app, you can enable push notifications. To setup a user medium you need to log in using either the Zabbix-Direct or DataForge app mode. Once logged in, you have to navigate to the push notification settings.
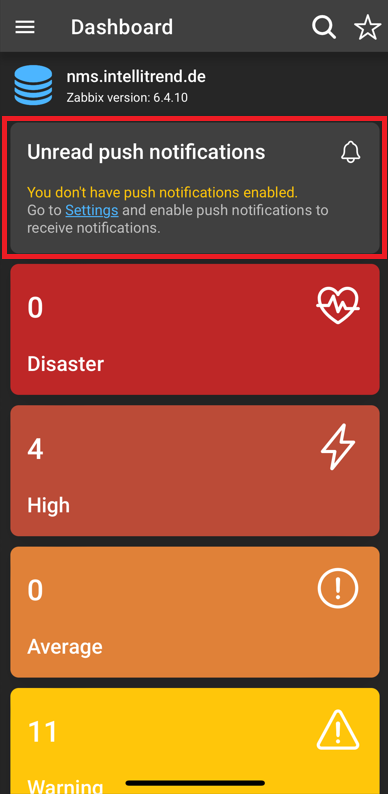
These can be accessed by using the navigation tree’s section Settings or by the section Unread Push Notifications of the dashboard.
The reference from the dashboard is only available if push notifications are disabled or an update is required.
Enable push notifications
Navigate to the push notification settings and enable the Push notification option. This opens the following modal:
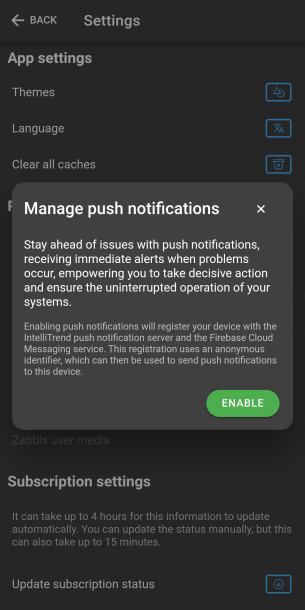
Press the Enable button. Upon pressing this button, a modal from your device’s operating system will appear, asking you to grant push notification permissions to the app. Make sure to grant the app this permission.
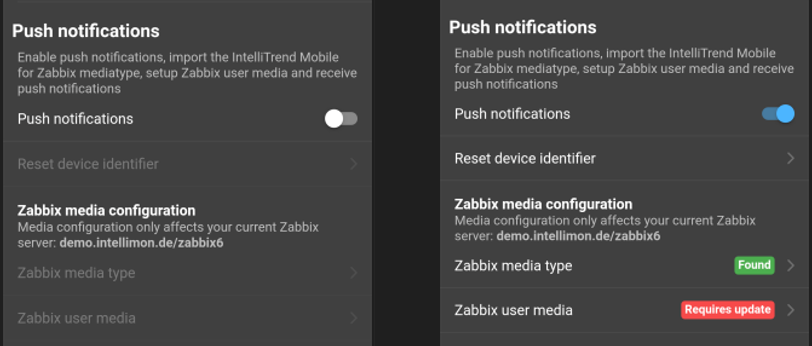
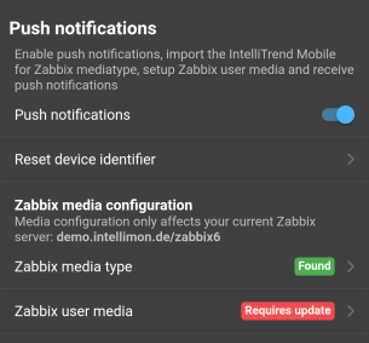
At this point push notifications are enabled in your app. If you already imported the media type from the section Download and import Zabbix media type, this should be reflected by the green Found chip next to Zabbix media type. The Zabbix user media is not configured yet and you should see the following screen on the settings page:
While the Push notification setting is global, the Zabbix media type and Zabbix user media sections are server specific. Global settings can be changed even if you are not logged in, but server-specific configurations can only be changed if you are logged in.
Zabbix media type
The IntelliTrend Mobile Zabbix media type is a webhook media type, that uses the IntelliTrend push notification server to send push notifications to mobile devices.
As previously mentioned, the downloaded Zabbix media type must be imported into or created on your Zabbix server. If it has been set up correctly, the Zabbix media type section displays a Found chip colored green. If not, a red Not found chip will be displayed.
Zabbix user media
The final step to enable and register your mobile device for push notifications is to add a Zabbix user medium to your Zabbix account. This step can be performed automatically by IntelliTrend Mobile for Zabbix if you are a privileged user (Variant 1: privileged user). If you are not a privileged user, this step has to be done manually by your Zabbix administrator (Variant 2: unprivileged user).
Depending on the app mode, the definition of a privileged user is different.
- DataForge: A user with a user role that has the ACL rule Can manage push media.
- Zabbix-Direct: A Zabbix user whose Zabbix role is either Admin or super admin.
Variant 1: privileged user
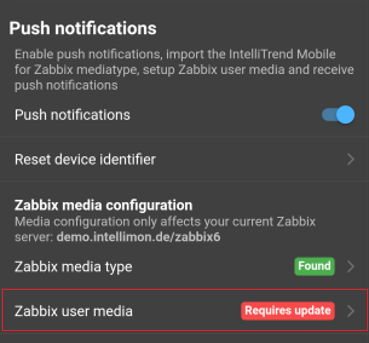
If you are a privileged user, you can use the IntelliTrend Mobile for Zabbix app’s built-in convenience feature. First tap Zabbix user media.
After that, there are two possible scenarios:
First time setup
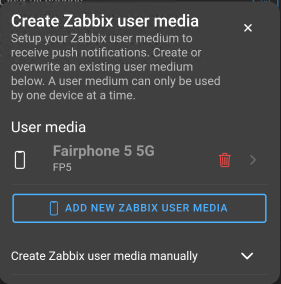
A form will appear. If this is the first time you are setting up a Zabbix user media, the list of registered devices should not show any registered devices. Tap on Add new Zabbix user media.
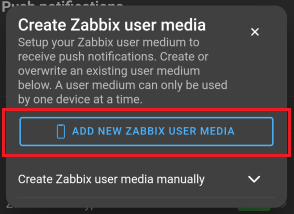
This creates the user media in Zabbix for you. You can tell wether this step was successful if your device name is displayed instead of the button.
Reactivation / Multiple devices
If this is not the first push notification setup for this Zabbix user, there may already be devices listed in addition to the Add new Zabbix user media button. If your device is in the list, simply click on it to bind the current app installation to your device.
The Add new Zabbix user media button only shows up, if your current device is not already registered.
If your device is not listed, you can register it. To register additional devices, click the Add new Zabbix user media button and follow the steps outlined in the chapter First time setup with each device you wish to register. This will add the device to the list of registered devices within IntelliTrend Mobile for Zabbix.
Variant 2: unprivileged user
If you are an unprivileged user, you will need the assistance of your Zabbix administrator to create your user media in Zabbix. Your admin will need a specific JSON string, that will be provided by our app.
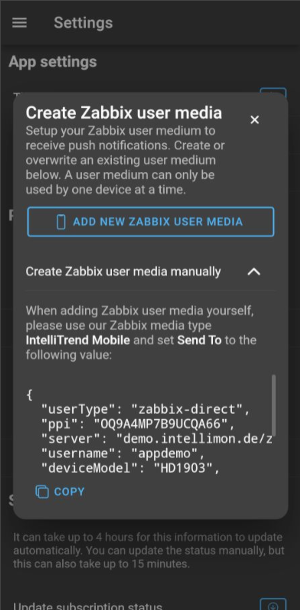
In the Push Notifications settings, ensure that push notifications are enabled. This enables access to Zabbix user media, which you must then tap on.
This will open a detailed view. Expand the section labeled Create Zabbix user media manually by tapping on it. The required JSON string will be displayed. Tap Copy to save the string to the clipboard. You must then provide this string to your admin.
The Send to JSON string
In the push notification settings, you can get obtain the Send to string for your current account.
Send to JSON string structure
{
    "userType": "YOUR_USER_TYPE",
    "ppi":"YOUR_PPI",
    "server":"SERVER_ADDRESS_OF_YOUR_ACCOUNT",
    "serverAlias":"SERVER_ALIAS_OF_YOUR_ACCOUNT",
    "username":"YOUR_USERNAME",
    "deviceModel":"YOUR_DEVICE_MODEL",
    "deviceName":"YOUR_DEVICE_NAME"
}
Manually configure Zabbix user media
Zabbix user media can be configured manually. This action is usually performed by Zabbix admins or super admins for specific users of our app. This applies for the user types under the following conditions:
- DataForge users: Users whose DataForge user role lacks the required ACL rule Can manage push media.
- Zabbix-Direct user: Zabbix Users who do not have the User type Admin or User type Superadmin.
To manually add media to a user in Zabbix, follow these steps:
- Navigate to Users > Users list and select a user.
- Switch to the Media tab.
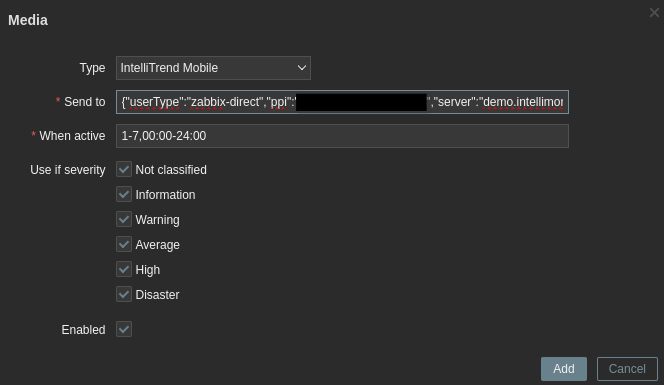
- Click Add to add a medium.
- For Type select the imported Zabbix media type IntelliTrend Mobile and for Send to the
Send touser specific JSON string is necessary. How this string can be obtained is described in chapter Obtain user specific JSON string. - Optionally, you can set up a schedule when push notifications should be active using the When active field or a severity filter using the Use if severity checkboxes.
User media that were created automatically using the IntelliTrend Mobile for Zabbix app also show up in the list of user media of their respective user in Zabbix.
More information about Zabbix user media and how to work with it can be found in the Zabbix documentation, in the chapter Zabbix user media .
Configure trigger action
You can now sign in to the Zabbix Frontend and configure alerts with operations as you would for any other media type. Existing trigger actions that use the Send only to: All option will now also begin sending push notifications with the IntelliTrend Mobile for Zabbix app.
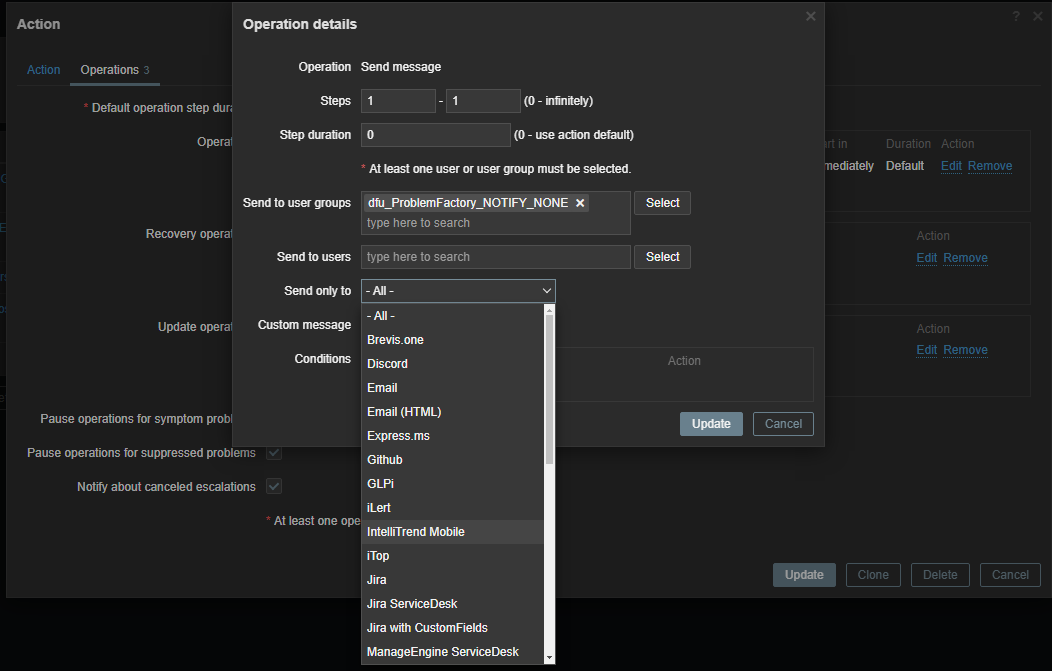
For example, to only receive push notifications when a problem arises, simply configure a trigger action and then select the IntelliTrend Mobile media type from the list of media types. Of course, you can also select all media types if you do not want to limit alerts to push notifications:
More information about Zabbix actions can be found in the Zabbix documentation chapter Actions .
Selecting a registered device
If you have registered multiple devices for your current Zabbix user, you must choose which user media should be bound to your app installation.
- Log in to your account and navigate to Settings.
- In the section Push notifications tap Zabbix user media.
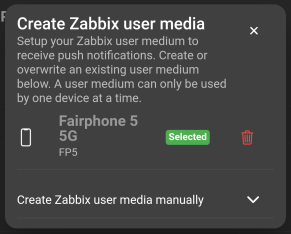
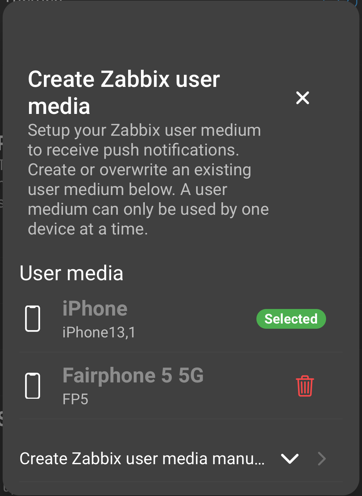
- This will open a form displaying all registered devices. To switch the current active device, tap the device you want to select.
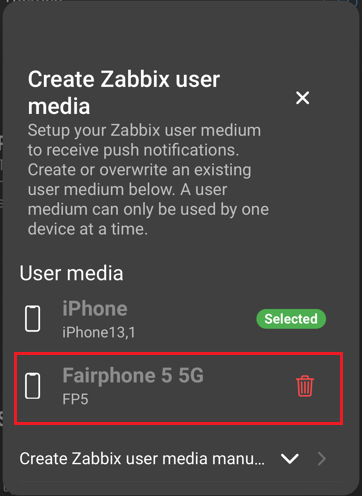
- Once selected, the active device will be updated, indicated by the green Selected chip next to its name.
Remove registered devices
To remove a registered device user media from your Zabbix user, follow these steps:
- Log in to your account and navigate to Settings.
- In the section Push notifications tap Zabbix user media.
- To remove a device, tap the Delete icon next to the device you want to remove.
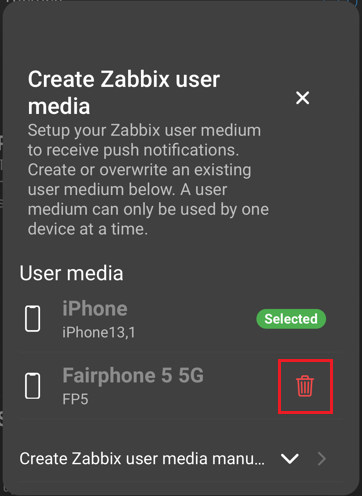
- The selected user media on your Zabbix server will now be removed.
Reset device identifier
The Reset device identifier option serves a specific scenario where you have lost your access to the Zabbix server.
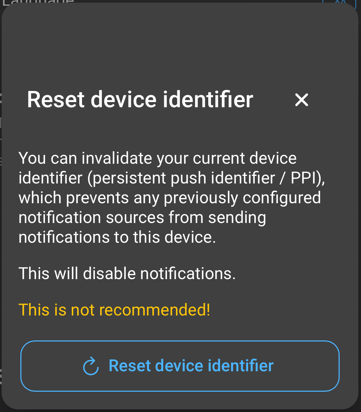
In such a case, you won’t be able to deregister your device from that specific server, as you have to be logged in with Zabbix-Direct or in Zabbix to remove your device. The reset device identifier option provides a solution to deregister your PPI (persistent push identifier) from the push notification server and delete it from your mobile device.
Even though the user media on the Zabbix server will persist, the actual delivery of push notifications will stop. The Zabbix server will continue attempting to trigger notifications via the push notification server, however, since the Reset device identifier option deregisters your device from the push server, no notifications will be transmitted. In this case, the push notification server will return the error inavalid credentials when the Zabbix server attempts to send alerts to the deregistered PPI.
Subscribe to alerts in DataForge
DataForge provides a user-friendly in-app solution for configuring severity-based notifications for host groups. Follow these steps to access and set up these notification settings:
- Navigate to Self Provisioning > Alerts, which offers a comprehensive list of all host groups available on the server.
- Identify the specific host group for which you want to set up notifications and click or tap on the Bell icon next to it. This action will open the subscription settings for that particular group.
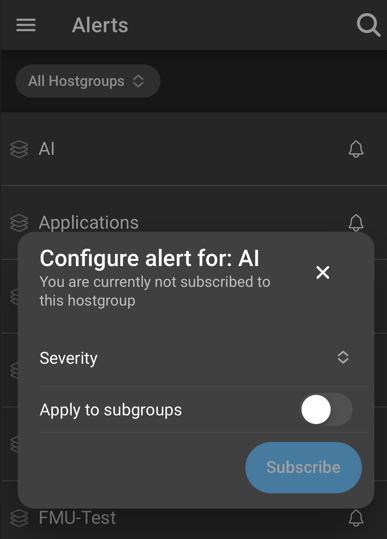
- Within the subscription settings, choose the desired Severity level. This setting determines the minimum severity required for a problem to trigger a notification.
- Optionally, you can choose to apply these settings to all subgroups of the selected host group by enabling Apply to subgroups.
- Once you’ve configured the notification settings to your preference, save the changes by clicking or tapping on the Subscribe button. This action activates the severity-based notification settings for the chosen host group.
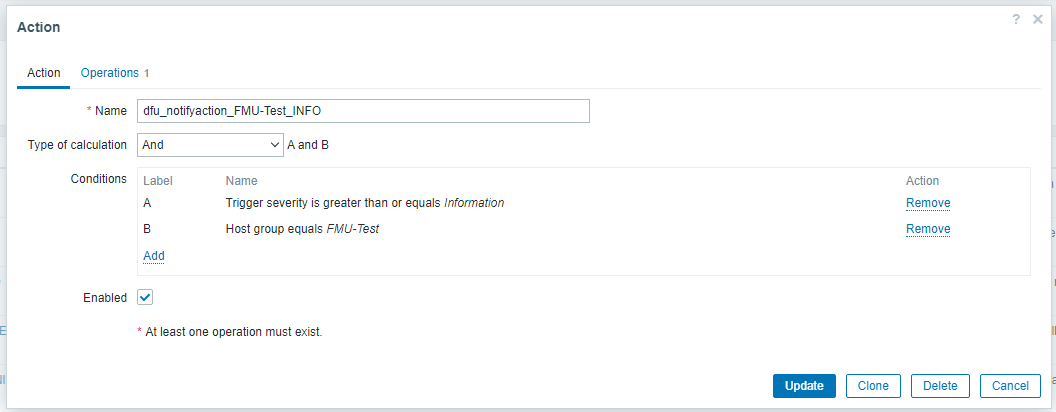
If you are using the Alerts section in DataForge, trigger actions with conditions for host group and severity level will be automatically created in Zabbix. These actions are designed to send messages through all available media types, including IntelliTrend Mobile.
Below is an example of how the trigger action conditions might appear:
FAQ
Why can regular Zabbix user (user type user) not add the user media through the app?
Zabbix does not allow users that do not have either the user type admin or superadmin to create user media, even if they are creating it for themselves.
Can I rename the “IntelliTrend Mobile” media type after importing it?
No. Our app checks for the media type by name, so renaming it will cause the app to no longer detect the media type.
I am not receiving push notifications, how can I troubleshoot this problem?
If you are having trouble getting push notifications to work, you can perform the following troubleshooting steps:
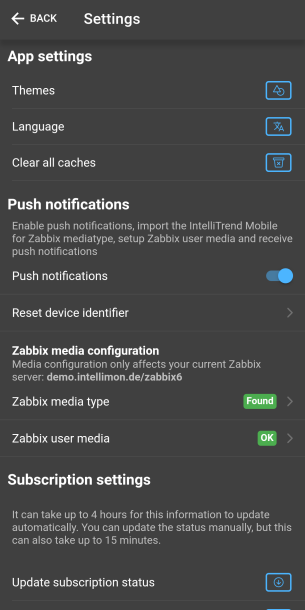
Step 1: Ensure notifications are set up correctly in the app
Navigate to the Settings page in the IntelliTrend Mobile for Zabbix app and ensure that your push notification section looks as follows, indicating that push notifications are enabled, the push media type is detected and that the user media exists and is up-to-date:
Step 2: Check for trigger action errors in Zabbix
Sign in to Zabbix and navigate to Monitoring > Problems, and click the icon displayed under actions, giving you an overview over the actions that were sent and if they had an error or not. Alternatively you can also check the action log, which can be accessed by navigating to Reports > Action log, to get an overview over all sent alerts.
If your alert shows up with the error invalid credentials, go back into the IntelliTrend Mobile for Zabbix app and double check that your Zabbix user media has the status OK. If this is the case, tap Reset device identifier and then confirm the reset in the modal that opens. After this update your user media and try again. If this does not fix the problem please contact customer support support@intellitrend.de.
Depending on your user type, resetting your device identifier may require the assistance of your Zabbix administrator to update your user media with the new device identifier, as explained previously.
If your alert shows up with any other error, try again after some time. If the issue persists, please contact customer support at support@intellitrend.de.
In case your alert does not show up in this list, your trigger action configuration is incorrect. You can validate that the setup works by performing a manual test as described below.
How can I test the IntelliTrend Mobile media type?
To test the IntelliTrend Mobile media type, begin by navigating to Alerts > Media types (Zabbix 6.4) or **Administration > Media types"" (Zabbix 6.0) and clicking the test button for the IntelliTrend Mobile media type. This should cause the following modal to open:

Begin by setting the title and body fields to any string you like.
Set the entity_id field to a valid Zabbix event ID, which you can obtain by navigating to Monitoring > Problems, clicking on a problem and then copying the event ID from the URL.
Set the severity field to a valid numeric severity such as 2 for warning. Check this documentation page and scroll down to the “severity” property if you are unsure about numeric severities.
To set the sendto parameter, open the IntelliTrend Mobile for Zabbix app, navigate to the Settings page, ensure that push notifications are enabled and then tap on Zabbix user media. In the user media modal, expand the Create Zabbix user media manually section and press the copy button to copy the configuration to your clipboard. Now paste this configuration into the media types sendto parameter.
Finally, press the Test button:

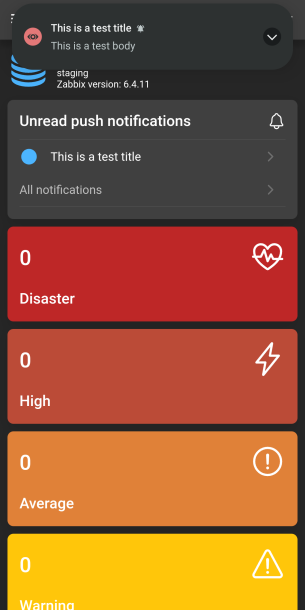
And view the notification on your device: