Import Zabbix users
These users authenticate against the Zabbix server rather than DataForge, ensuring controlled access to data of the Zabbix server they are part of. Additionally, it simplifies the integration of existing Zabbix user databases with DataForge.
To import users, they have to exist on the Zabbix server that was added to DataForge. DataForge provides a user-friendly import wizard that assigns the dfu_import group to these users. This group allows the Zabbix users to be imported.
Imported users only have access to the Reporting feature of DataForge, if they are a part of a DataForge user group.
Import users via wizard
In order for Zabbix users to be imported, they must be part of the dfu_import group. The import wizard can assign the Zabbix users to this group. You also have the option to manually assign the Zabbix user to the dfu_import group.
You can access the import wizard by:
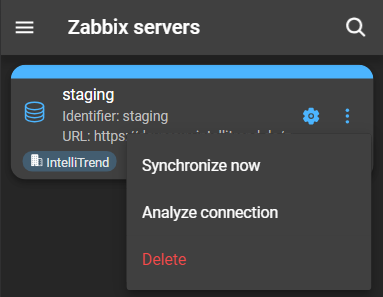
- Navigating to Administration > Zabbix servers and clicking the server’s configuration button.
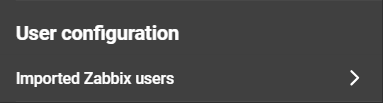
- At the bottom of the details page, you can find the section User configuration. Click on Imported Zabbix users to open a list of imported users:
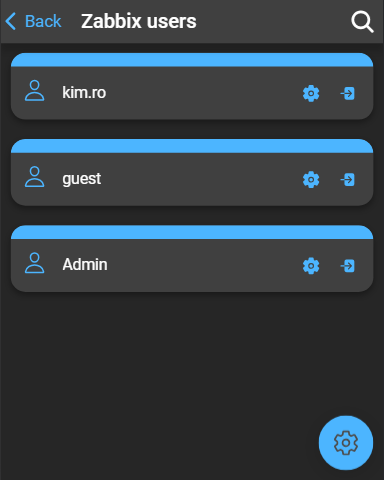
- Open the import wizard by clicking the configuration button located in the bottom-right corner.
- To import new users, click inside the search box to either search for users or select them from the dropdown.
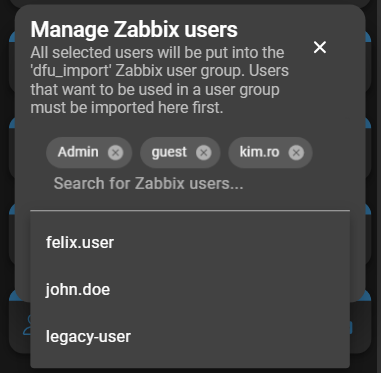
- Click Save Changes to apply the changes to the imported users.
The newly imported users will be visible in the list of Zabbix users. Service users are excluded from the import process and will not be listed within the wizard.
Import a user manually
To manually import a user, the user must be a member of the dfu_import group on the Zabbix server:
- Navigate to the Zabbix user to be imported and assign the user to the
dfu_importgroup.
Or
- Navigate to the
dfu_importgroup and assign the user to be imported to the group.
A user that is added manually to dfu_import will not automatically appear in the list of imported users in DataForge. For them to become visible and operational, a synchronization between the DataForge and the Zabbix server is necessary.
Manage imported users
To manage the imported users, navigate to the User Configuration within the Zabbix server’s detail page and click Imported Zabbix users.
Edit imported user
Click the configuration button of a user to access their detailed information:
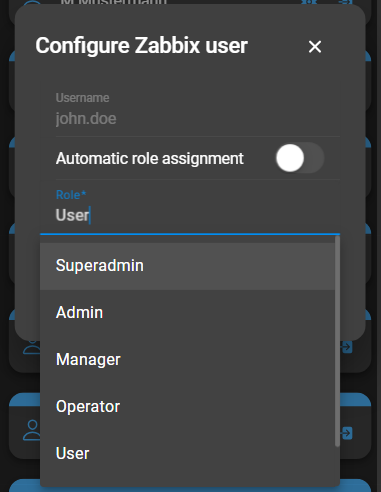
- Username: Displays the username assigned to the user on the Zabbix server and cannot be changed.
- Automatic Role Assignment: Enables or disables the automatic role assignment.
- Role: Only editable if the Automatic Role Assignment is disabled. Change the user’s DataForge role.
Click Save to apply the changes.
Impersonate imported user
To impersonate a user, click its Impersonate button.
If a user is impersonated, it allows acting on their behalf within their scope. This is further explained in chapter Impersonating.
Synchronize DataForge and Zabbix
For the user to show up in DataForge, DataForge and the Zabbix server have to be synchronized.
This can be done manually or is automatically triggered. A server has a predefined synchronization interval or synchronizes when the server is started. You can manage this interval within the server configuration, using the CLI key user-sync-schedule. Additionally, synchronization can be initiated when the server starts by using the CLI key user-sync-on-start.
Synchronize manually
To synchronize manually, follow these steps:
- Navigate to Administration > Zabbix servers.
- Click on the context menu button of the server that requires a synchronization.
- click Synchronize Now.