Installation
This chapter will provide a reference docker compose file to use for deployment. All services of a Daforge deployment may run in Docker, except the Dataforge server, which is installed natively as a systemd service.
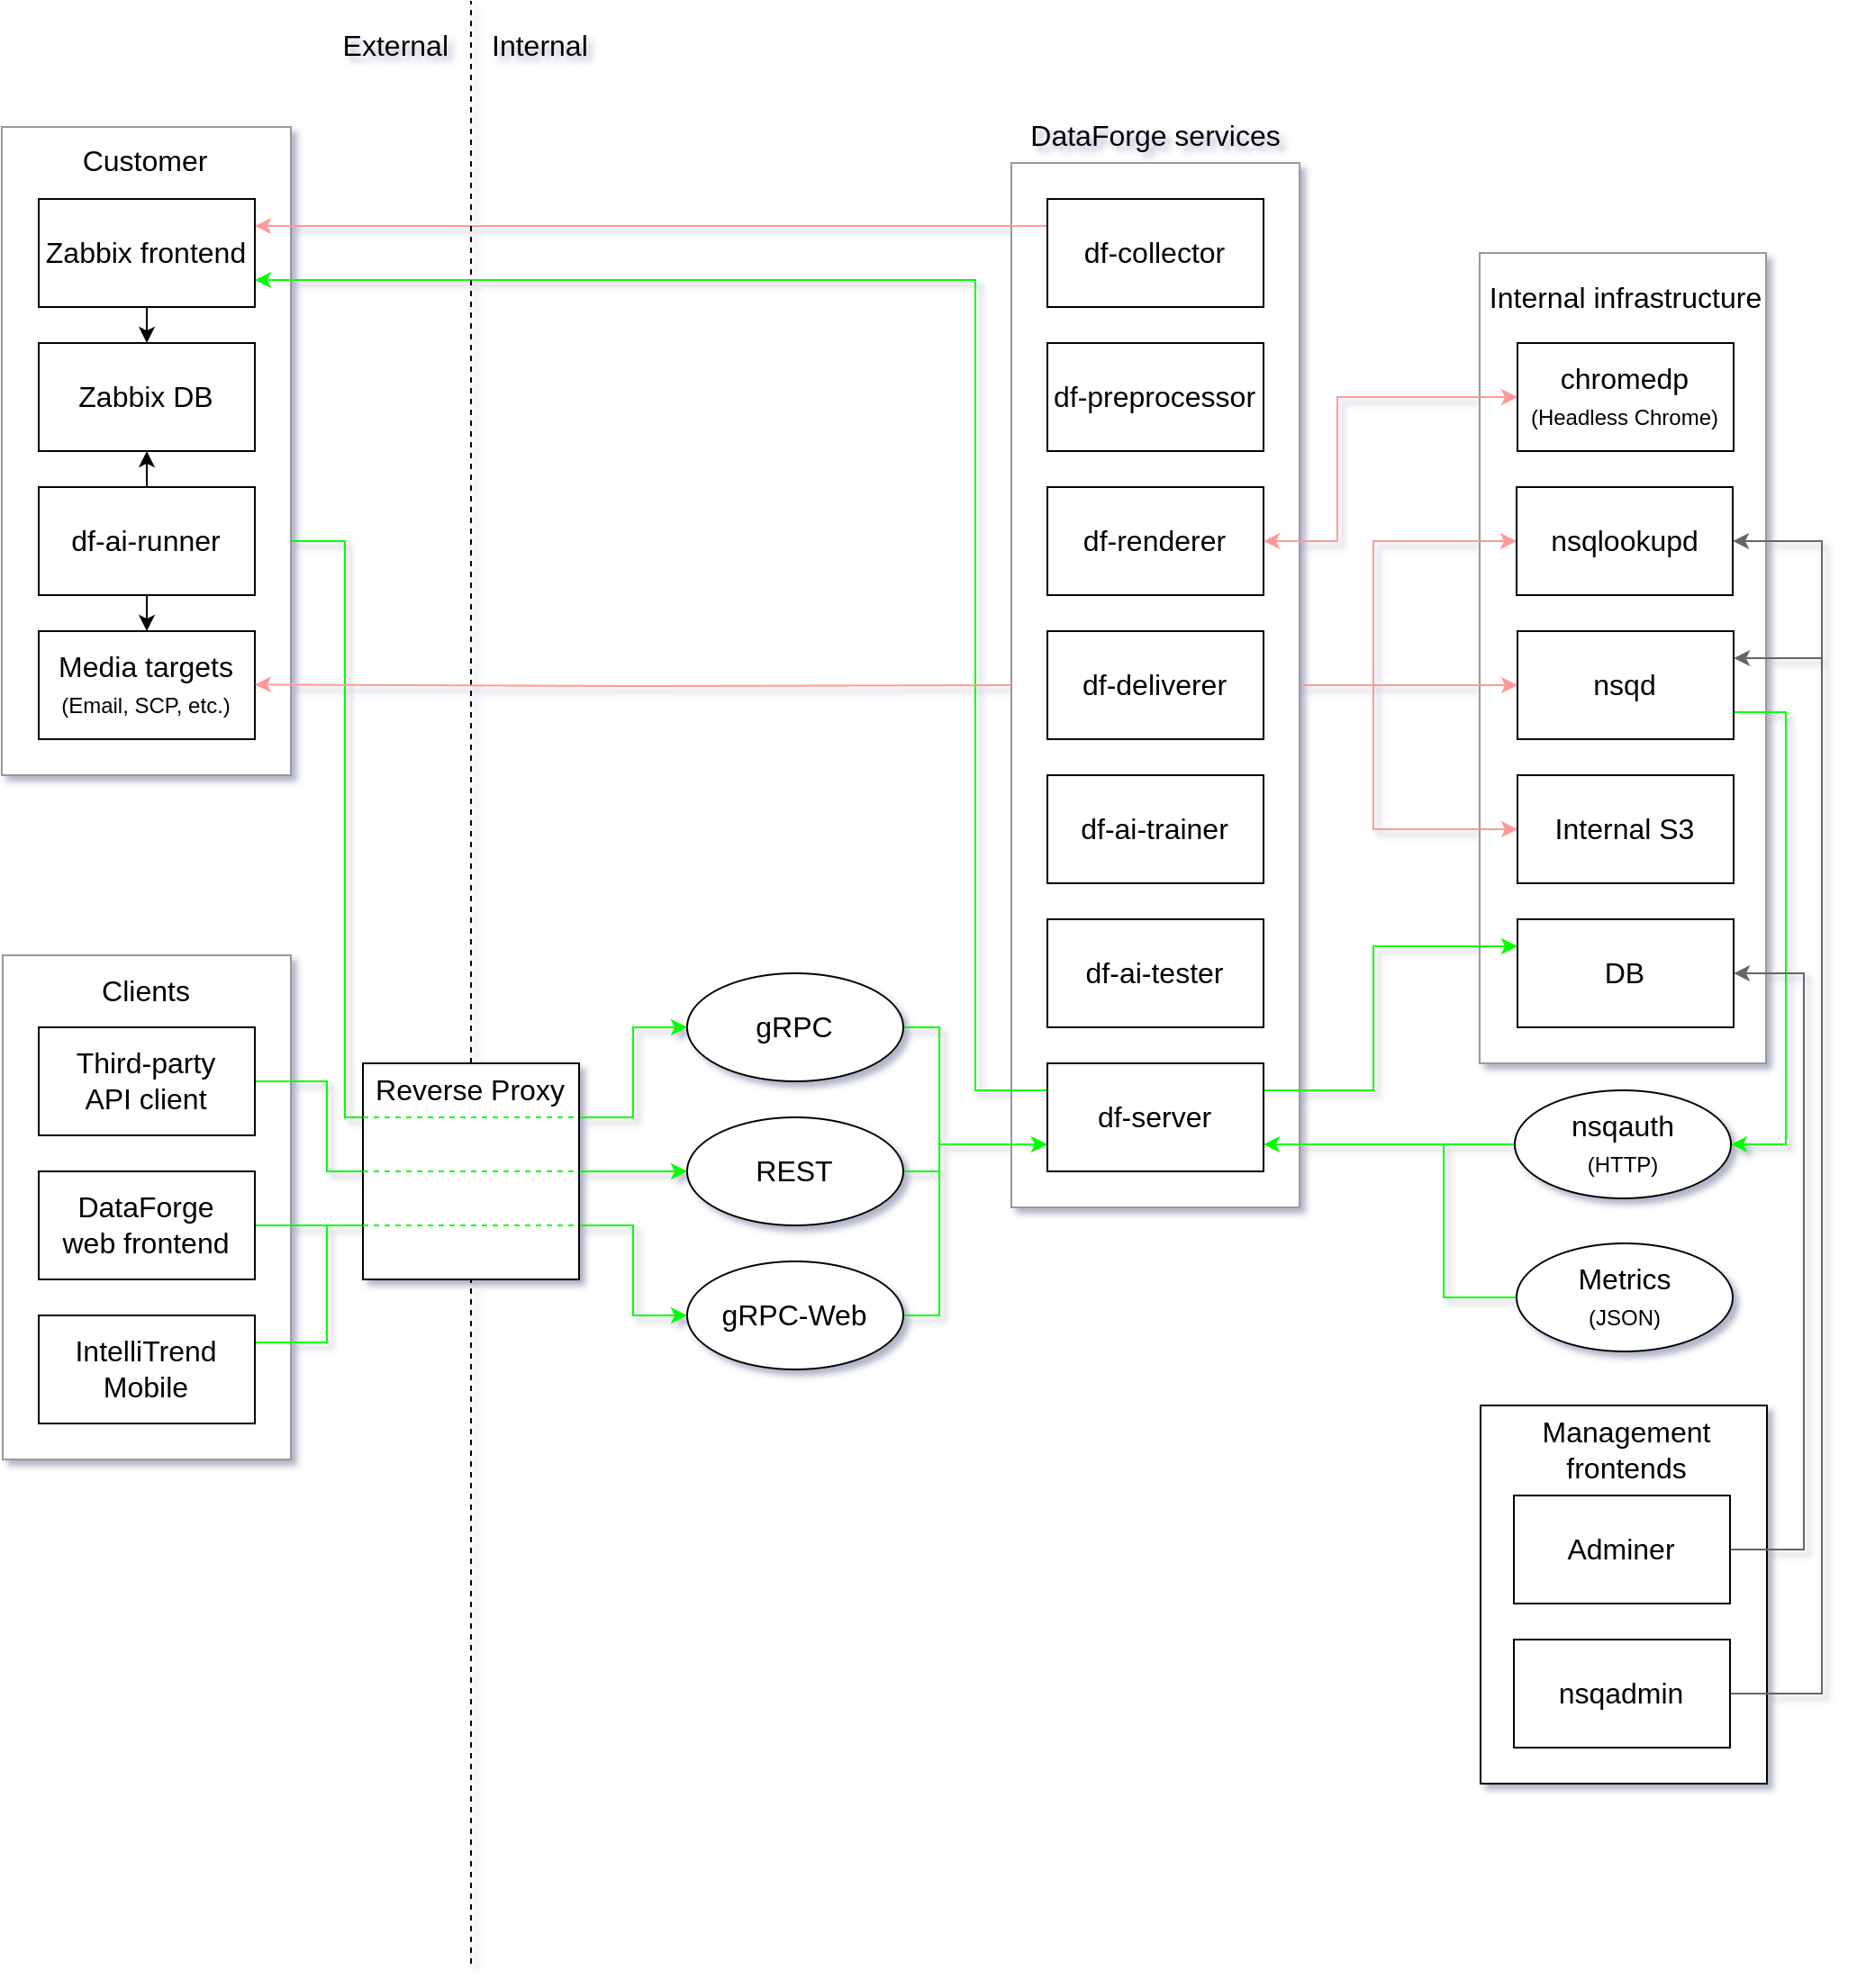
Architecture diagram
Refer to this diagram for an overview of the general architecture of DataForge:
Service dependencies
Because a DataForge deployment consists of multiple services, there are some network dependencies between the services.
Most of these dependencies are already dealt with as part of the docker-compose setup, but please refer to this table if you would like to understand the relationships between the services (the source service always depends on the destination service).
| Source Service | Destination Services |
|---|---|
| df-frontend | df-server gRPC-Web API must be reachable from browsers using the df-frontend |
| df-server | mariadb, nsqd, nsqlookupd, seaweedFS, Zabbix API |
| df-collector | nsqd, nsqlookupd, seaweedFS, Zabbix API |
| df-preprocessor | nsqd, nsqlookupd, seaweedFS |
| df-renderer | nsqd, nsqlookupd, seaweedFS, chromedp |
| df-deliverer | nsqd, nsqlookupd, seaweedFS, delivery targets |
| df-ai-trainer | nsqd, nsqlookupd, seaweedFS |
| df-ai-tester | nsqd, nsqlookupd, seaweedFS |
| df-ai-runner | df-server, seaweedFS |
| nsqd | nsqlookupd, df-server (nsqauth) |
| nsqlookupd | nsqd |
| chromedp | df-deliverer |
| mariadb | – |
| seaweedFS | – |
Network requirements
A DataForge deployment needs to connect to various different network services. Following is an overview of requirements on the network to allow for communication between the various services.
Note that this does not include internal connections between DataForge services that are deployed together in a single docker-compose environment by default. Instead, this overview is intended as a hint about potentially necessary firewall rules.
Network connection requirements for the client
| Outgoing connections | ||||
|---|---|---|---|---|
| Source | Port | Destination | Purpose | |
| Web browser / IntelliTrend Mobile for Zabbix app | 80/tcp or 443/tcp | df-frontend reverse proxy | Access to static frontend files and the gRPC-Web DataForge Server API | |
| IntelliTrend Mobile for Zabbix app | 443/tcp | push.intellitrend.de | Configuration of push notifications. (Only required when using Push notifications) | |
Network connection requirements for the server
| Incoming connections | ||||
|---|---|---|---|---|
| Destination | Port | Source | Purpose | |
| df-frontend reverse proxy | 443/tcp or 80/tcp | Clients (Web browser / IntelliTrend Mobile for Zabbix app) | Providing access to the df-frontend and the gRPC-Web DataForge Server API | |
| df-server | 8090/tcp, 8091/tcp, 8092/tcp | df-frontend reverse proxy (gRPC-Web), Clients (gRPC-REST) | Providing access to the gRPC native, gRPC-Web and gRPC-REST API | |
| Outgoing connections | ||||
| Source | Port | Destination | Purpose | |
| df-server, df-collector | 443/tcp | Your configured Zabbix frontend servers | Access to Zabbix API of configured servers | |
| df-deliverer | Various | Configured delivery targets | Delivery of reports to configured destinations | |
| df-ai-runner | 443/tcp | seaweedFS | Access to S3 object storage containing the trained AI models | |
Deploying DataForge using Docker Compose
1. Prerequisites
To set up a new DataForge instance, a number of prerequisites have to be met.
Please carefully read and verify these, so you don’t run into any problems during the installation.
1.1 Preparing the host system
To set up a DataForge server, you will need a Linux machine with Docker and Docker Compose installed.
You can check whether they are installed by running the following commands:
docker version
docker compose version
1.2 Network considerations
Your server will need to have access to our license servers (reachable at license1.intellitrend.de and license2.intellitrend.de).
Additionally, the server needs to be reachable via HTTP/HTTPS (by default on ports 80/443, but this can be changed). Alternatively, you can use an external reverse proxy to terminate TLS and forward the connection to the DataForge frontend internally.
1.3 Obtaining the necessary credentials
Once you have purchased a DataForge license, we will send you various credentials for your DataForge instance:
- Your license key (a file ending in
.key) will authenticate your DataForge server to our license server and enable all features included in your subscription - The docker registry credentials are used to pull the Docker images from our Docker registry
You will need these credentials during the installation process. Please do not share the credentials with anybody.
Additionally, you will need the following:
- A valid TLS server certificate, if you want to serve DataForge with TLS (Alternatively, you can terminate TLS using an external, already existing reverse proxy)
- Credentials for an email server you want to use with your DataForge server
2. Setting up the environment
Download the DataForge deployment package and extract it to a directory on your server (We recommend the name “dataforge”).
Download deployment packageRename the included template.env file to .env, which contains the most important configuration parameters. (Navigate into the directory using cd dataforge and rename the file using mv template.env .env.)
Edit this file with an editor of your choice (for example nano or vim) and replace YOUR_DATAFORGE_VERSION at the top of the file with the version of DataForge that you want to install.
The FRONTEND_URL in the .env file should be replaced by the URL the frontend will later be accessed at.
It should contain the URL scheme (http:// or https://) and the hostname (with a port, if the default ports 80/443 are not used).
It should not contain a path or a trailing slash.
The .env file also contains placeholders ([REPLACE_ME]) that should be replaced by random secrets.
For your convenience, we provide a gen_passwords.sh file which will automatically generate new secrets for your DataForge installation.
Simply run the command bash ./gen_passwords.sh to generate random secrets.
Take note of the newly generated DEFAULT_ACCOUNT_PASSWORD in the .env file, as you will need it for your first login to your DataForge server.
DF_SERVER_NSQSECRET must not be the same as DF_COLLECTOR_NSQSECRET).
Secrets and some key configuration options are managed using a .env file.
# Set your DataForge version in the line below (For example 7.6.13)
DF_VERSION=YOUR_DATAFORGE_VERSION
# The docker registry the DataForge images are pulled from
DF_DOCKER_REGISTRY_PATH=images.intellitrend.de/dataforge/dataforge-core

# The timezone of your DataForge server
TIMEZONE=Europe/Berlin

# The URL at which your frontend will be reachable at by users
FRONTEND_URL=[REPLACE_ME]

# The database (root) credentials
DB_DATABASE=dataforge
DB_USERNAME=dataforge
DB_PASSWORD=[REPLACE_ME]

# The master key used to encrypt database values and sign sessions
MASTER_KEY=[REPLACE_ME]

# The SMTP credentials to use for sending emails
SMTP_HOST=[REPLACE_ME]
SMTP_PORT=465
SMTP_USERNAME=[REPLACE_ME]
SMTP_PASSWORD=[REPLACE_ME]
# One of: none, starttls-mandatory, starttls-opportunistic, tls-explicit (default)
SMTP_TLS_MODE=tls-explicit
# One of: none, PLAIN (default), LOGIN, CRAM-MD5
SMTP_AUTH_MECH=PLAIN
# The sender email address for emails sent by the DataForge server
SMTP_FROM_ADDRESS=[REPLACE_ME]

# The master key for the internal S3 server
S3_MASTER_KEY=[REPLACE_ME]

# The credentials of the DataForge default account (admin@dataforge.loc)
DEFAULT_ACCOUNT_ENABLED=true
DEFAULT_ACCOUNT_PASSWORD=[REPLACE_ME]

# Secrets for authentication on the NSQ message queue
DF_SERVER_NSQSECRET=[REPLACE_ME]
DF_COLLECTOR_NSQSECRET=[REPLACE_ME]
DF_PREPROCESSOR_NSQSECRET=[REPLACE_ME]
DF_RENDERER_NSQSECRET=[REPLACE_ME]
DF_DELIVERER_NSQSECRET=[REPLACE_ME]
3. Installing your license key file
Copy your DataForge license key (from step 1) into the same directory as your docker-compose.yaml and rename it to dataforge.key.
Your DataForge server will use this file to communicate with one of our redundant license servers and activate the modules in your subscription. For this reason, the DataForge server will need to be able to reach our license servers.
4. Review the docker-compose.yaml file
The included docker-compose.yaml file defines how the services will start.
If you have any problems setting up the DataForge server, you may need to modify this file to match your system configuration.
You can consult the official docker-compose file reference or contact our support for further assistance.
The following is the content of the included docker compose file (docker-compose.yaml).
This docker compose file is used to deploy all services including the DataForge server.
services:
    # ------------  DF Frontend  ------------
    df-frontend:
        container_name: df-frontend
        image: ${DF_DOCKER_REGISTRY_PATH}/df-frontend:${DF_VERSION}
        restart: always
        logging:
            driver: "json-file"
            options:
                max-size: "10m"
                max-file: "5"
        ports:
            - 80:80
            # Uncomment this line if you want to terminate TLS in this container.
            #- 443:443
        volumes:
            - ./df-frontend/data/cfg/df-base.conf:/etc/nginx/conf.d/df-base.conf

            # Uncomment this line if TLS is terminated on an external proxy
            #- ./df-frontend/data/cfg/df-http.conf:/etc/nginx/conf.d/default.conf

            # Uncomment these lines if you want to terminate TLS in this container.
            # You will need to install your TLS certificates in the directory below.
            #- ./df-frontend/data/cfg/df-https.conf:/etc/nginx/conf.d/default.conf
            #- ./df-frontend/data/ssl/:/etc/nginx/ssl/

    # ------------  DF Server  ------------
    df-server:
        image: ${DF_DOCKER_REGISTRY_PATH}/df-server:${DF_VERSION}
        restart: always
        logging:
            driver: "json-file"
            options:
                max-size: "10m"
                max-file: "5"
        command: ./df-server
        depends_on:
            postgres:
                condition: service_healthy
            s3:
                condition: service_healthy
        environment:
            # API Server Configuration
            DF_SERVER_LOG_LEVEL: "info"
            DF_SERVER_SERVER_GRPC_PORT: "8090"
            DF_SERVER_SERVER_GRPC_WEB_PORT: "8091"
            DF_SERVER_SERVER_REST_PORT: "8092"
            DF_SERVER_SERVER_FRONTEND_URL: $FRONTEND_URL
            DF_SERVER_SERVER_CORS_ALLOWED_ORIGINS: "$FRONTEND_URL http://localhost capacitor://localhost"
            DF_SERVER_SERVER_SLOW_QUERY_THRESHOLD: "1500"
            DF_SERVER_SERVER_THREAD_GUARD_ENABLE: "true"
            DF_SERVER_SESSIONS_EXPIRY: 3600
            # Initialization
            DF_SERVER_INIT_DEFAULT_ACCOUNT_ENABLED: $DEFAULT_ACCOUNT_ENABLED
            DF_SERVER_INIT_DEFAULT_ACCOUNT_PASSWORD: $DEFAULT_ACCOUNT_PASSWORD
            # Encryption
            DF_SERVER_CRYPTO_MASTER_KEY: $MASTER_KEY
            # User Sync
            DF_SERVER_USERSYNC_SYNC_ON_START: true
            DF_SERVER_USERSYNC_SCHEDULE: "0 3 * * *" # we will sync with all zabbix servers, every day at 03:00
            # User Cache
            DF_SERVER_CACHING_EVICTION_TIME: 3600 # users get evicted after one hour of inactivity
            DF_SERVER_CACHING_HOUSEKEEPER_SCHEDULER: "*/15 * * * *" # run housekeeper every 15min
            # HA
            DF_SERVER_HA_ENABLE: "false"
            DF_SERVER_HA_LEADER_LEASE_LENGTH: 60
            DF_SERVER_HA_LEADER_INITIAL_LEASE_LENGTH: 150
            DF_SERVER_HA_LONG_POLL_INTERVALL: 30
            DF_SERVER_HA_SHORT_POLL_INTERVALL: 15
            # NSQ
            DF_SERVER_NSQRPC_CONTROL_MESSAGE_TIMEOUT: 600 # 10 minutes maximum transactions between services
            DF_SERVER_NSQ_SERVICE_IDENTITY: "dataforge_server"
            # NSQ connection
            DF_SERVER_NSQ_CONSUME_PORT: "4161"
            DF_SERVER_NSQ_CONSUME_ADDRESS: "nsqlookupd"
            DF_SERVER_NSQ_PRODUCE_PORT: "4150"
            DF_SERVER_NSQ_PRODUCE_ADDRESS: "nsqd"
            # NSQ TLS
            DF_SERVER_NSQ_TLS_ENABLE: "false"
            DF_SERVER_NSQ_TLS_CA_CERTIFICATE: "/usr/local/intellitrend/df/ssl/ca.cert"
            DF_SERVER_NSQ_TLS_SKIP_CERTIFICATE_VALIDATION: "true"
            # NSQ Authentication
            DF_SERVER_NSQAUTH_ENABLE: "true"
            DF_SERVER_NSQAUTH_PORT: "4180"
            DF_SERVER_NSQ_AUTH_SECRET: $DF_SERVER_NSQSECRET
            DF_SERVER_NSQAUTH_SERVER_SECRET: $DF_SERVER_NSQSECRET
            DF_SERVER_NSQAUTH_COLLECTOR_SECRET: $DF_COLLECTOR_NSQSECRET
            DF_SERVER_NSQAUTH_PREPROCESSOR_SECRET: $DF_PREPROCESSOR_NSQSECRET
            DF_SERVER_NSQAUTH_RENDERER_SECRET: $DF_RENDERER_NSQSECRET
            DF_SERVER_NSQAUTH_DELIVERER_SECRET: $DF_DELIVERER_NSQSECRET
            # Licensing
            DF_SERVER_LICENSE_PATH: "/usr/local/intellitrend/df/etc/df.key"
            # Zabbix
            DF_SERVER_ZABBIX_TRACE_ENABLE: "false"
            # TLS
            DF_SERVER_SERVER_GRPC_WEB_TLS_ENABLE: "false"
            DF_SERVER_SERVER_TLS_CERTIFICATE_PATH: "/usr/local/intellitrend/df/ssl/df-server.cert"
            DF_SERVER_SERVER_TLS_PRIVATE_KEY_PATH: "/usr/local/intellitrend/df/ssl/df-server.key"
            # Database
            DF_SERVER_DB_PORT: 5432
            DF_SERVER_DB_NAME: $DB_DATABASE
            DF_SERVER_DB_ADDRESS: postgres
            DF_SERVER_DB_USER: $DB_USERNAME
            DF_SERVER_DB_PASSWORD: $DB_PASSWORD
            DF_SERVER_DB_DRIVER: "postgres"
            DF_SERVER_DB_TRACE_ENABLE: "false"
            DF_SERVER_DB_RECONNECT_DELAY: 15
            # S3
            DF_SERVER_S3_MASTER_ADDRESS: s3
            DF_SERVER_S3_MASTER_KEY: $S3_MASTER_KEY
            DF_SERVER_S3_MASTER_PORT: 9333
            DF_SERVER_S3_STORAGE_URL: "s3:8333"
            DF_SERVER_S3_SYNC_INTERVAL: 300
            DF_SERVER_S3_TRACE_ENABLE: false
            # SMTP
            DF_SERVER_MAILER_SMTP_HOST: $SMTP_HOST
            DF_SERVER_MAILER_SMTP_PORT: $SMTP_PORT
            DF_SERVER_MAILER_SMTP_USERNAME: $SMTP_USERNAME
            DF_SERVER_MAILER_SMTP_PASSWORD: $SMTP_PASSWORD
            DF_SERVER_MAILER_SMTP_TLS_MODE: $SMTP_TLS_MODE
            DF_SERVER_MAILER_SMTP_AUTH_MECH: $SMTP_AUTH_MECH
            DF_SERVER_MAILER_SMTP_USER_AGENT: "df-server"
            DF_SERVER_MAILER_SMTP_HELO_NAME: "" # if left empty, will use hostname by default
            DF_SERVER_MAILER_FROM_ADDRESS: $SMTP_FROM_ADDRESS
            # LDAP
            DF_SERVER_LDAPAUTH_ADDRESS: ""
            DF_SERVER_LDAPAUTH_PORT: 389
            DF_SERVER_LDAPAUTH_DOMAIN: ""
            DF_SERVER_LDAPAUTH_TLS_ENABLE: "false"
            DF_SERVER_LDAPAUTH_TLS_CA_CERTIFICATE: ""
            DF_SERVER_LDAPAUTH_TLS_SKIP_CERTIFICATE_VALIDATION: "false"
            # Metrics
            DF_SERVER_METRICS_PORT: "8094"
            DF_SERVER_METRICS_IDENTITY: "df-server"
            DF_SERVER_METRICS_HISTORY_SIZE: 1000
            DF_SERVER_METRICS_STATE_FILE: "/usr/local/intellitrend/df/var/metrics/state.json"
        #ports:
        #  - 4180:4180 # NSQ-Auth
        #  - 8090:8090 # gRPC
        #  - 8091:8091 # gRPC-Web (exposed through df-frontend reverse proxy)
        #  - 8092:8092 # REST
        #  - 8094:8094 # Metrics
        volumes:
            # Place your license key here
            - ./dataforge.key:/usr/local/intellitrend/df/etc/df.key:ro
            # A directory used to persist metrics between restarts
            - ./df-server/data/metrics/:/usr/local/intellitrend/df/var/metrics:rw

    # ------------  DF Collector  ------------
    df-collector:
        image: ${DF_DOCKER_REGISTRY_PATH}/df-collector:${DF_VERSION}
        restart: always
        logging:
            driver: "json-file"
            options:
                max-size: "10m"
                max-file: "5"
        environment:
            DF_COLLECTOR_LOG_LEVEL: "info"
            DF_COLLECTOR_NSQ_SERVICE_IDENTITY: "dataforge_collector"
            DF_COLLECTOR_NSQ_AUTH_ENABLE: "true"
            DF_COLLECTOR_NSQ_AUTH_SECRET: $DF_COLLECTOR_NSQSECRET
            DF_COLLECTOR_NSQ_CONSUME_PORT: "4161"
            DF_COLLECTOR_NSQ_CONSUME_ADDRESS: "nsqlookupd"
            DF_COLLECTOR_NSQ_PRODUCE_PORT: "4150"
            DF_COLLECTOR_NSQ_PRODUCE_ADDRESS: "nsqd"
            DF_COLLECTOR_METRICS_IDENTITY: "df-collector"
        depends_on:
            df-server:
                condition: service_started
            nsqd:
                condition: service_started

    # ------------  DF Preprocessor  ------------
    df-preprocessor:
        image: ${DF_DOCKER_REGISTRY_PATH}/df-preprocessor:${DF_VERSION}
        restart: always
        logging:
            driver: "json-file"
            options:
                max-size: "10m"
                max-file: "5"
        environment:
            DF_PREPROCESSOR_LOG_LEVEL: "info"
            DF_PREPROCESSOR_NSQ_SERVICE_IDENTITY: "dataforge_preprocessor"
            DF_PREPROCESSOR_NSQ_AUTH_ENABLE: "true"
            DF_PREPROCESSOR_NSQ_AUTH_SECRET: $DF_PREPROCESSOR_NSQSECRET
            DF_PREPROCESSOR_NSQ_CONSUME_PORT: "4161"
            DF_PREPROCESSOR_NSQ_CONSUME_ADDRESS: "nsqlookupd"
            DF_PREPROCESSOR_NSQ_PRODUCE_PORT: "4150"
            DF_PREPROCESSOR_NSQ_PRODUCE_ADDRESS: "nsqd"
            DF_PREPROCESSOR_METRICS_IDENTITY: "df-preprocessor"
        depends_on:
            df-server:
                condition: service_started
            nsqd:
                condition: service_started

    # ------------  DF Deliverer  ------------
    df-deliverer:
        image: ${DF_DOCKER_REGISTRY_PATH}/df-deliverer:${DF_VERSION}
        restart: always
        logging:
            driver: "json-file"
            options:
                max-size: "10m"
                max-file: "5"
        environment:
            DF_DELIVERER_LOG_LEVEL: "trace"
            DF_DELIVERER_NSQ_SERVICE_IDENTITY: "dataforge_deliverer"
            DF_DELIVERER_NSQ_CONSUME_PORT: "4161"
            DF_DELIVERER_NSQ_CONSUME_ADDRESS: "nsqlookupd"
            DF_DELIVERER_NSQ_PRODUCE_PORT: "4150"
            DF_DELIVERER_NSQ_PRODUCE_ADDRESS: "nsqd"
            DF_DELIVERER_NSQ_AUTH_ENABLE: "true"
            DF_DELIVERER_NSQ_AUTH_SECRET: $DF_DELIVERER_NSQSECRET
            DF_DELIVERER_METRICS_IDENTITY: "df-deliverer"
        depends_on:
            df-server:
                condition: service_started
            nsqd:
                condition: service_started

    # ------------  DF Renderer  ------------
    df-renderer:
        image: ${DF_DOCKER_REGISTRY_PATH}/df-renderer:${DF_VERSION}
        restart: always
        logging:
            driver: "json-file"
            options:
                max-size: "10m"
                max-file: "5"
        environment:
            DF_RENDERER_LOG_LEVEL: "info"
            DF_RENDERER_NSQ_SERVICE_IDENTITY: "dataforge_renderer"
            DF_RENDERER_NSQ_CONSUME_PORT: "4161"
            DF_RENDERER_NSQ_CONSUME_ADDRESS: "nsqlookupd"
            DF_RENDERER_NSQ_PRODUCE_PORT: "4150"
            DF_RENDERER_NSQ_PRODUCE_ADDRESS: "nsqd"
            DF_RENDERER_NSQ_AUTH_ENABLE: "true"
            DF_RENDERER_NSQ_AUTH_SECRET: $DF_RENDERER_NSQSECRET
            DF_RENDERER_RENDERER_CHROME_ADDRESS: "pdf-worker"
            DF_RENDERER_RENDERER_CHROME_PORT: "9222"
            DF_RENDERER_RENDERER_WEBSERVER_ADDRESS: "df-renderer"
            DF_RENDERER_METRICS_IDENTITY: "df-renderer"
        depends_on:
            df-server:
                condition: service_started
            nsqd:
                condition: service_started
            pdf-worker:
                condition: service_started

    # ------------  Chrome headless  ------------
    pdf-worker:
        image: chromedp/headless-shell:130.0.6723.70
        restart: always
        logging:
            driver: "json-file"
            options:
                max-size: "10m"
                max-file: "5"

    # -----------  Postgres database  -----------
    postgres:
        image: postgres:17
        restart: always
        logging:
            driver: "json-file"
            options:
                max-size: "10m"
                max-file: "5"
        environment:
            POSTGRES_DATABASE: $DB_DATABASE
            POSTGRES_USER: $DB_USERNAME
            POSTGRES_PASSWORD: $DB_PASSWORD
        volumes:
            - ./postgres/data/var/lib/postgres/data:/var/lib/postgresql/data:rw
        healthcheck:
            test: ["CMD", "pg_isready", "--username", $DB_USERNAME]
            interval: 1m
            timeout: 5s
            retries: 5
            start_period: 1m30s
            start_interval: 1s
        #ports:
        #    - "5432:5432"

    # ------------  NSQLookupd  ------------
    nsqlookupd:
        image: nsqio/nsq
        restart: always
        logging:
            driver: "json-file"
            options:
                max-size: "10m"
                max-file: "5"
        command: /nsqlookupd
        #ports:
        #    - 4161:4161

    # ------------  NSQD  ------------
    nsqd:
        image: nsqio/nsq
        restart: always
        logging:
            driver: "json-file"
            options:
                max-size: "10m"
                max-file: "5"
        command: /nsqd --lookupd-tcp-address=nsqlookupd:4160 --auth-http-address=df-server:4180 --mem-queue-size=1000000 --max-msg-size=419430400 --data-path /nsqd-data --broadcast-address=nsqd
        depends_on:
            nsqlookupd:
                condition: service_started
        volumes:
            - ./nsqd/data/nsqd-data:/nsqd-data
        environment:
            HTTP_PROXY: ""
            HTTPS_PROXY: ""
            http_proxy: ""
            https_proxy: ""
        #ports:
        #    - 4150:4150

    # ------------  SeaweedFS / S3  ------------
    s3:
        image: chrislusf/seaweedfs:3.80
        restart: always
        logging:
            driver: "json-file"
            options:
                max-size: "10m"
                max-file: "5"
        #ports:
        #    - 8333:8333 # S3 API HTTP
        #    - 9327:9327 # Metrics port (must be enabled in command)
        command: "server -s3 -master.volumePreallocate=false" # -metricsPort=9327
        volumes:
            - ./seaweed/data:/data:rw
        environment:
            HTTP_PROXY: ""
            HTTPS_PROXY: ""
            http_proxy: ""
            https_proxy: ""
        healthcheck:
            test: "wget --quiet --tries=1 --output-document=/dev/null http://127.0.0.1:8333/healthz || exit 1"
            interval: 1m
            timeout: 5s
            retries: 5
            start_period: 1m30s
            start_interval: 1s
5. Configure TLS / reverse proxy
The df-frontend container includes an nginx server which serves the DataForge frontend to browsers and also forwards any requests at /service.DataForge to the gRPC-Web API of the df-server container.
By default, the df-frontend container listens on port 80 (unprotected HTTP).
Security features in modern browsers require that the DataForge frontend and the gRPC-Web API of the DataForge server are reachable from your browser using HTTPS.
You can either configure an external reverse proxy or you can set up the nginx server in the frontend container to serve HTTPS.
5.1. Using an external reverse proxy
If you have an existing reverse proxy handling HTTPS termination, edit the docker-compose.yaml file as follows:
- In the
df-frontendservice definition, uncomment the bind mount for the./df/frontend/data/cfg/df-http.confconfig file - Make sure the
df-https.confconfig file is not included - The
df-frontendservice definition in yourdocker-compose.yamlfile should now look like this (with additional lines omitted at[...]):df-frontend: # [...] ports: - 80:80 volumes: - ./df-frontend/data/cfg/df-base.conf:/etc/nginx/conf.d/df-base.conf - ./df-frontend/data/cfg/df-http.conf:/etc/nginx/conf.d/df.conf
Now you can simply configure your external reverse proxy to pass any requests to a subdomain of your choice to port 80 of the df-frontend container.
Most common reverse proxies (such as Traefik, nginx or Apache) should be usable for this purpose.
For configuration instructions, please consult the documentation of your specific reverse proxy software. The following endpoints need to be configured:
- Any URLs at
https://yoursubdomain/need to point to the HTTP or HTTPS endpoint of thedf-frontendcontainer. - The reverse proxy must allow websocket upgrades for any URLs starting with
https://yoursubdomain/service.intellimon/Stream*, whereStream*means any method that starts withStream.
If you use an external reverse proxy, you need to make sure that the connection from the reverse proxy to the df-frontend container is trusted (i.e. the external reverse proxy is installed on the same server), because otherwise the traffic might be intercepted.
This could allow attackers to leak secrets or modify requests sent to the DataForge server.
If the reverse proxy is running on a different host or the connection is not trusted for some other reason, you can follow the steps described in Section 5.2. using an internal (potentially self-signed) certificate to additionally protect this communication.
5.2. Serve HTTPS using included nginx
If you have a TLS certificate, you can configure the df-frontend container to serve HTTPS.
To configure this nginx server to serve HTTPS, simply follow these steps:
- Create a new directory
df-frontend/data/ssl. - Rename your HTTPS/TLS certificate and private key to
df-frontend.certanddf-frontend.keyrespectively and place them both inside the newly createddf-frontend/data/ssl/directory - Edit the
docker-compose.yamlfile:- In the
df-frontendservice definition, uncomment the bind mount for the./df/frontend/data/cfg/df-https.confconfig file - Make sure the
df-http.confconfig file is not included - Uncomment the port mapping
443:443, so the HTTPS service is exposed outside the container. (Port 80 will redirect HTTP clients to HTTPS on port 443) - The
df-frontendservice definition in yourdocker-compose.yamlfile should now look like this (with additional lines omitted at[...]):df-frontend: # [...] ports: - 80:80 - 443:443 volumes: - ./df-frontend/data/cfg/df-base.conf:/etc/nginx/conf.d/df-base.conf - ./df-frontend/data/cfg/df-https.conf:/etc/nginx/conf.d/df.conf
- In the
If you have a .pfx file instead of separate files for your certificate and private key (for example, if you’re using Active Directory Certificate Services), you can extract the certificate and private key into separate files as follows.
Run the following command to extract the certificate:
openssl pkcs12 -in yourfile.pfx -clcerts -nokeys -out df-frontend.cert
Run the following command to decrypt and extract the private key:
openssl pkcs12 -in yourfile.pfx -nocerts -noenc -out df-frontend.key
You will be prompted to type the import password. Type the password that you used to protect your keypair when you created the .pfx file.
Keep the .key file secure, as it contains an unencrypted private key.
6. Run services
First, make sure to sign in to the docker image registry (docker login images.intellitrend.de) using the credentials that were provided to you when purchasing DataForge.
Start the all services by running docker compose up -d.
You can now access the DataForge frontend using the configured port and protocol.
You can see the server logs for any errors using docker compose logs.
Optionally, you can specify a specific service, such as docker compose logs df-server.
If you encounter any problems or need help with your configuration, please contact us. We’re happy to help you!
Next steps
After successfully installing your DataForge server, open the DataForge frontend in your web browser using the configured port and protocol. You can sign in using default DataForge Manager account, which has the following credentials:
- Email: admin@dataforge.loc
- Password: the (generated) password from
DEFAULT_ACCOUNT_PASSWORDin the.envfile
We highly recommend that you create a new DataForge Manager account with a secure password, and then disable the default account using the DEFAULT_ACCOUNT_ENABLED flag the .env file.
By disabling the default DataForge Manager account, you ensure that only the newly created DataForge Manager has access to DataForge. This is a good security practice to prevent unauthorized access to the DataForge server.
You should have at least one Manager account with the Superadmin role, which has elevated privileges to help with managing the instance.
Learn more about DataForge managers and how to create them in the chapter DataForge Manager.
After signing into the DataForge frontend, you can proceed as follows:
- Visit the License page to review your license parameters.
- Check the Microservices page to see if all your microservices have been detected correctly. The following microservices should appear at least once in the list:
df-collectordf-preprocessordf-rendererdf-deliverer
- Refer to the DataForge Manager manual to continue with your Zabbix server setup before being ready to use the DataForge user features.
- Refer to the DataForge User manual to start working the DataForge user feature like the Zabbix-Client, Self-Provisioning, Reporting or DataForge AI.
If you need any help, don’t hesitate to contact us.
Notes about bundled internal storage
If you would like to use the reporting and DataForge AI functionality, you need to configure an S3 bucket in DataForge.
Since DataForge v7.8, you can use the bundled internal storage, based on SeaweedFS. You can simply select “Internal storage” in the Zabbix server configuration.
If you ran the ./gen_passwords.sh script, a secure secret key will have already been created, otherwise, you’ll need to configure the S3_MASTER_KEY manually.
This internal storage is only intended for use by one DataForge server, which also handles credential management, etc.
If you need to access the S3 bucket from outside of the DataForge instance, we recommend setting up a reverse proxy to forward https://s3.example.org/ to port 8333 on the S3 / SeaweedFS docker container.
You can use the following S3 credentials to authenticate to the S3 API provided by SeaweedFS (see the SeaweedFS documentation):
- Username:
admin_access_key - Password: The
S3_MASTER_KEYconfigured on the server (in the.envfile)